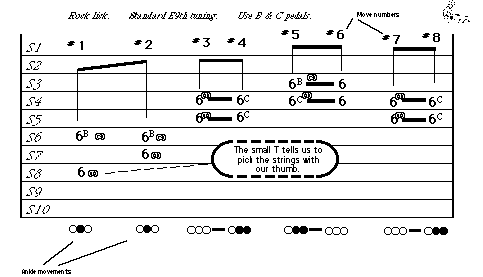
I also show the pedal moves beside
the fret numbers. I also put numbers above each movement so we can dig
into the the very basics of the lick. Lets get started with move #1.
Move #1 I would probably pick this using my thumb
and second finger. The thing to remember is to look ahead when you're
practicing. Pick move #1 and then block it before move #2. The small
(T) stands for the thumb. The (2) tells you to pick the string with
the second finger.
Move #2 I would pick this one with (1) & (2).
Most would use thumb and second finger but I have my first finger already
on the middle string because I pick block. I place my thumb, first,
& second finger on adjacent strings. For this move it would be string
8, string 7 and string 6.
Move #3 Before we pick the strings for move #3 we
have to block the strings from move #2. There are many ways to block
and all can be developed as different techniques. I would pick this
lick with the (T)thumb & (1) first finger. Looking ahead I see that
move four is a pedal movement.
Move #4 The key to move #4 is to see that it is the
pedal movement that gives us our sound. You pick the strings in move
#3 and bend them in move #4. That gives us two eighth notes and we only
have to pick once. See that as a time to move your right hand in preparation
for move #5. Remember, you have to think ahead.
Move #5 First we have to block the sound from move
#4. I would pick this with my (1)first finger & (2) second finger.
Once again its because I have my picks on the strings at all times.
This move sets the strings in motion and then move #6 is rocking off
pedals B & C. We only have to pick once and pedal once but we get
two sounds. At fast tempos, this rest for the right hand can be extremely
important.
Move #6 Nothing but the sound of the foot coming
off the pedals. The solid bar between fret numbers show us that a slide
or pedal move is taking place. Looking ahead we see that all we have
to do is block the sound from the pedal move we just made and use the
exact same fingers to pick move #7. Take a look at moves 3 through 8.
They are all the same pick the strings and then move the pedals.
Move #7 This is move #3 repeated. The key to the
way I picked this is that I can make move #1 & #2, move my hand
up for move #3, and then without moving my right hand use (1) &
(2) to pick the adjacent strings. I would let the fingers that are on
the strings pick them. When I pick block I leave my (T)humb, (1)first
finger, (2)second finger and (3)third finger on the strings ready to
pick the strings.
Move #8 This move is the pedals B & C bending
the strings. Practice the alternate fingering that is shown. You could
use many different ways to finger this lick, but each of those are a
separate technique in themselves. Learn to isolate your movements. Break
your licks and movements down into their smallest parts and put them
back together. Then write some licks out in tablature, without using
your guitar.
Part 2
Top of page
The lick below is shown with eighth
notes. The fingering that you use is up to you on this one. Some may
play it with the thumb and second finger, which is traditional. The
important thing is to see other ways of picking this example. Let's
take a look at each movement and analyze them.
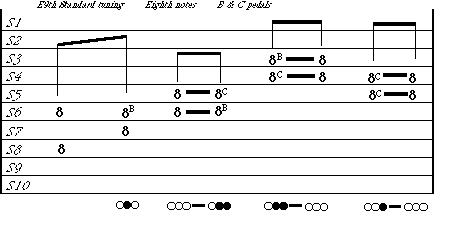
The first move
has us at the eighth fret picking string 6 and string 8. I would use
my thumb and second finger but would have my first finger resting on
the 7th string ready to play. After we pick those two strings we have
to block them to get ready to play the next move. The method of blocking
is up to you. Depending on your style, you can pick block, palm block,
or left hand block.
The second movement
could be picked with the first and second finger. I would use this so
and not move my right hand to use my second finger and thumb as is the
traditional method. Notice that the second pedal is pushed for the second
move. There are no pedal slurs heard so you should pick the first move,
block it, and at the same time everything is blocked push the B pedal
and then pick the second move.
The third movement
is the picking of the strings. I would use my thumb and first finger.
The fourth movement
is the pushing down of the B & C pedal. The strings are not picked
on this movement. The sound comes from the pedals bending the strings
up.
I would pick the fifth
move with my second & third finger. Traditional methods would have
you moving your right hand up and using your thumb and second finger.
I would keep my hand still and use the fingers that I have resting on
those strings already. I place them their when I picked the third move.
The less movement I have to make, the faster I can play.
The sixth move
is nothing more than you releasing the B & C pedal. The thing to
see is when you push the pedals down for move #4, you have them already
in place for the next picking motion.
The seventh movement
would be picked with my first & second finger. My right hand would
not move for moves 3 through 7. Using the pick on my third finger of
my right hand makes it natural to keep my hand still and let my fingers
do the work. Notice that between move 6 and 7 you have to push the pedals
down while the strings are blocked. Then you pick move number seven.
The movements have to be done silently. You need to learn to look ahead
and see what's coming next.
Part 3
Top of page
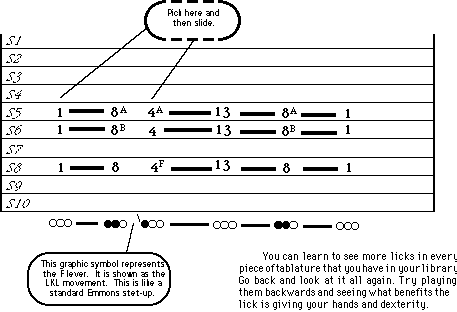
Inversions & Numbers
The following example shows us picking
a three finger grip. The result of the pedal moves and the slides gives
us all three inversions of an F triad. This lick can only be done on
a pedal steel. We can pick the strings one time and play all three inversions
without having to pick the strings again. This slide and the strings
being raised and lowered at the same time, gives us our characteristic
sound of the E9th pedal steel guitar. The first movement is the picking
of the strings 8, 6, & 5 at the first fret. This is a first inversion
of the major triad. The next move is the slide and pedals changing the
strings.
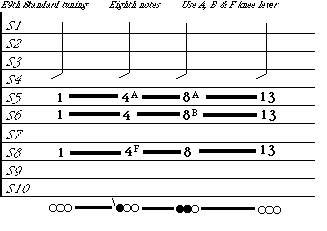 |
The
F knee lever raises the fourth & eighth strings a half step.
Practice this example as written until you can smoothly play it
up the fretboard. You should keep a steady pace for each inversion.
Another way to practice it is to pick each inversion and not let
the slide be heard. You could also pick every other inversion. |
Lets take a look at the numbers.
The numbers represent the left hand movements. The frets we use are
1, 4, 8 & 13. One, four, eight, and thirteen. This gives us all
of our inversions in the key of F. So to transpose this to another key
we would simply add to the numbers. For the key of F# we would add (1)
to each number. Everything else will stay the same. The numbers will
change because we need new frets to change the key.
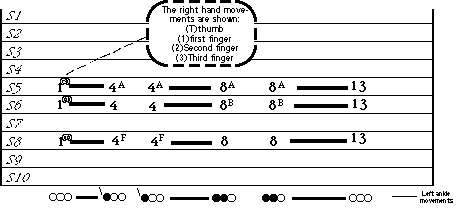
Learn to look at the right hand
movements, left hand movements and pedal/knee moves separately. In the
above example we can have a new lick by changing the left hand numbers
and leaving everything else the same.
We can practice these inversions in every key. We do this by adding
to the numbers. Here are the numbers and their keys. Remember, keep
the right hand and pedal/knees the same. The left hand changes in this
exercise.
Key F	1,4,8,13		Key B	7,10,14,19

Key F#	2,5,9,14		Key C	8,11,15,20

Key G	3,6,10,15		Key C#	9,12,16,21

Key G#	4.7.11.16		Key D	10,13,17,22

Key A	5,8,12,17		Key D#	11,14,18,23

Key A#	6,9,13,18		Key E	12,15,19,24
Part 4
Top of page
Variations
We can expand on changing movements
to make new licks. Below we see variations of the F inversions from
our previous method. The key is seeing that more licks can be found
right from the one that is tabbed out in front of you. When you look
at tablature that someone has written, think about moving some of the
basic ingredients around to make new moves.
As you learn the moves to the above
lick, try changing the frets that the left hand move to and from. This
will change the keys of the lick. When you use different frets, your
left hand must move a different distance.
- Play this lick in all twelve keys.
- Play this lick using different right hand picking patterns.
- Pick every move or pick and utilize the slide and pedal sounds.
Practice this move with different
string grips. You could use any of the following three finger grips
and have a new lick.
- 3rd, 4th, & 5th strings.
- 4th, 5th, and 6th strings.
- 5th, 6th and 8th strings. (as written above)
- 6th, 8th, and 10th strings.
- 3rd, 5th, and 8th strings. (wide grip)
- 4th, 6th, and 10th strings. (wide grip)
Another way to find licks is to
play the above one backwards. Each lick has an opposite that is a new
movement to learn. Your hands need to start on any of the strings or
frets or pedals and hopefully you can train them to make whatever move
you want, whenever you want. That's called improvisation.
The above move is written... Pick
and slide. Pick and slide. Pick and slide.
The above lick is for a standard E9th tuning, with standard pedals.
Practice this is all of the keys.
You can also work on changing which group of strings the right hand
picks. Changing the grip will give you the added sound of using different
gauge strings. The characteristics of the strings will determine which
inversions or grips you use when you play these arpeggios. Keep practicing.
Part 5
Top of page
Another Variation
We use the example lick below to
show one more variation of the inversions. The key is learning to slide
and move the pedals in a smooth and coordinated manner. To practice
all of these sliding moves, start real slow. Even exaggerate the slowness.
Try to be in control of every aspect of these licks. Even practice each
of the moves separately. You can use different banks of strings on the
E9th neck so be sure to practice all the variations you can from any
lick. Change the right hand. Change the left hand numbers. Start with
the pedals down instead of up. Do the opposite move. All these can be
ways to get your playing out of a rut. Change the rhythm and that will
give you a new lick.
You can have a slide of any given
distance and it can be any speed. You can also get into the amount of
vibrato that you put on the bar. Think of things in as much detail as
possible and soon they become less overwhelming.
This lick below mixes up the inversions.
The key is to teach your left hand the different distances that it has
to move. Make up exercises that allow you to make thousands of left
hand moves. For example, you can start and the first fret and then move
to every other fret.
It would read like this:
- First fret to second fret.
- Second fret back to first fret.
- First fret to third fret.
- Third fret to first fret.
- First fret to fourth fret.
- Fourth fret to first fret.
- Continue up the fretboard in the same manner.
Top of page