
Table of Contents
|
||||||||||||||||||||||
 |
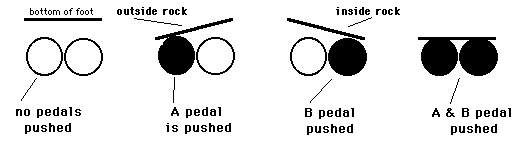
Here we see three open circles that represent your A, B, and C pedals. To the left we see our first six movements that we need to teach our ankle. |
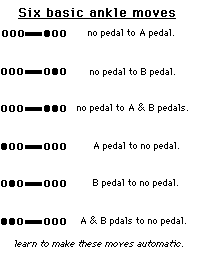 |
These moves are the simplest ones that you can make with your ankle. Slowly start training your ankle to do these moves. The best way is to learn things slow and then increase your speed as your profieciency starts to improve. I go into this theory with more detail in my book, MY Approach to Pedal Steel. Remember, work slowly and put the music into your hands and feet. The time you spend woodshedding will show up down the road in your playing. Don't give up, work hard. |
Part III
Top of page Moving from position to position. That's the important thing to remember
when you practice your E9th tuning. Those great sounds are lying right
at your feet. All you need to do is work them into shape so lets continue
with some more position to position moves.
I've stressed that movement is the thing that has to be learned by the
muscles in your ankle. To help get your playing skills into shape, you
can work on these moves without worrying about a lick.
Just set at your guitar and make your foot do the movements. Don't even think about nothing but the move. You should also do this with your right hand and left hand movements but for now just the left foot gets the work out. This isolation of movement will help to build your proficiency at playing a steel guitar. When you think of only one thing and concentrate on that, all the other things don't get it the way. In the end you have to combine a lot of moves to play a lick but we know we can get there faster by looking at the little parts and putting them back together.
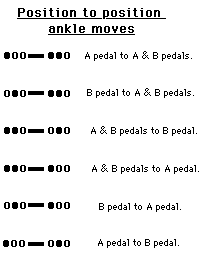 |
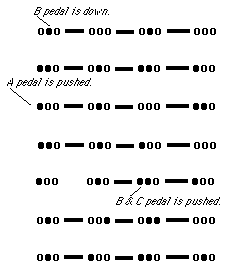
Notice that all of the above position movements start with the pedals down and end up with a pedal or pedals down. These are ones that are really hard and should be given a lot of concentration. The hardest ones are: B pedal to A pedal and A pedal to B pedal. Another exercise is to try and play a lick with each of the pedal moves. Let the movement of the pedal help you find a lick. You need to know what strings each pedal uses to do this. |
Part IV
Top of pageWhen you work on the ankle movements apart from the right and left hand moves, you can help train them to make the moves you need. Every lick is a group of movement and you need your ankle to play music. When I speak of training your ankle, I'm talking about approaching it like an athlete. The better condition you're in, the better results you will have in your playing. As your ankle gets better you should start to feel your feet floating over the pedals. Not just mashing them, but actually think about playing music with your ankle.
This next group of exercises will be more involved than the previous pages. Now we will add complex movements together. Once again, we are concentrating on just the ankle. You can work on putting everything together at a later date, but isolate all the movements when you first learn them.
|
Above are some advanced movements that you need to develop. The solid bar between each pedal symbol tells you that a string would be bending if you were picking one. For now just worry about the movement. The smooth motion of your ankle is the important thing for you to concentrate on. Isolate the motion and work on it slowly. These are movements that will be used in the heat of battle so why not go on ahead and work them out now, before you have an audience of other musicians watching over your shoulder. |
When you look at tablature thats in a publication, look further and learn to isolate each of the individual moves. There is the left hand, right hand, knee levers, and pedals. All of these have to combine to play a lick. You need to give them each their own merit. Dedicate practice time to each component and then put them all together. The advantages will show up in your playing abilities if you stick to your program.
 |
|||